chemical etching stainless steel

etching process step by step

Step-by-Step Guide to the Etching Process Etching is a technique used to create detailed designs or patterns on a variety of materials such as metal, glass. It is widely used in industries like electronics, jewelry, and signage. This guide explains the etching process step by step and highlights the equipment used. Step 1: Preparing the […]

Step-by-Step Guide to the Etching Process

Etching is a technique used to create detailed designs or patterns on a variety of materials such as metal, glass. It is widely used in industries like electronics, jewelry, and signage. This guide explains the etching process step by step and highlights the equipment used.

Step 1: Preparing the Material

Before starting the etching process, clean the surface of the material thoroughly to remove any dirt or grease. This ensures the design adheres properly.

Step 2: Applying the Resist

A resist is a protective coating applied to the areas that should not be etched. This can be done using a stencil, tape, or by hand-painting the resist onto the surface. The resist shields these areas from the etching solution.

Step 3: Drying the Resist

Allow the resist to dry completely.

Step 4: Exposing the Design

For intricate designs, use a UV exposure machine. Place a transparent film with the design over the resist-coated material, then expose it to UV light. This hardens the resist in the areas that should remain untouched during the etching process.

Step 5: Developing the Design

After exposure, develop the material to remove the unexposed resist. This reveals the areas to be etched. Use a developer solution specific to the resist material for the best results.
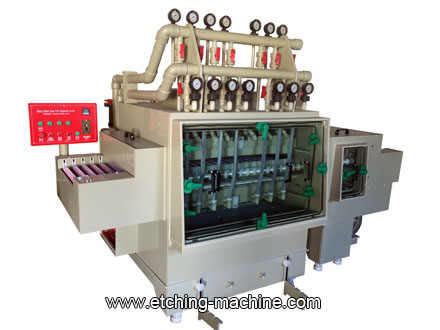
Step 6: Etching the Material

Immerse the prepared material in an etching solution, such as ferric chloride for metals. The solution removes the unprotected areas, creating the desired pattern or design. Monitor the process closely to avoid over-etching.

Step 7: Cleaning the Material

Once the etching is complete, rinse the material with water to stop the etching process. Make sure to remove all traces of the etching solution to prevent further corrosion.

Step 8: Removing the Resist

Peel off or wash away the resist using a suitable solvent. This reveals the final etched design. Ensure all resist residue is removed for a clean finish.

Step 9: Final Touches

Inspect the etched material for any imperfections. Polish or finish the surface as needed to enhance the appearance of the design.

By following these steps and using the right equipment, you can achieve high-quality etching results for various applications. Etching allows for creativity and precision in many different fields, making it a valuable technique for professionals and hobbyists alike.

The chemical etching process, step by step

See the step-by-step detail and FAQ below. >Chemical etching is a subtractive manufacturing process, and the sequence below is the one most photo etching jobs follow. Understanding each stage is useful when you are specifying a part, because the stage that limits your design is rarely the one you would guess.

Step one is surface preparation. The metal arrives with mill oil, scale and handling residue, and any of these will print into the resist and cause the etch to be uneven. The sheet is cleaned and degreased so that the resist wets evenly and the subsequent exposure is sharp.

Step two is resist coating. A photosensitive polymer is applied to the cleaned sheet and dried to a controlled thickness. The resist is what protects the metal that must not be etched, so its uniformity directly determines the fidelity of the finished pattern.

Step three is exposure. The part artwork is transferred to a photographic mask, and the sheet is contact printed or exposed by laser. Contact printing gives the sharpest edge for most work; laser exposure is used where the artwork is complex or the mask would be impractical.

Step four is development. The exposed areas of the resist are washed away, leaving the pattern open and the rest of the sheet still masked. At this point the part is still a solid masked sheet, but the geometry of the finished part is already decided.

Step five is etching. The sheet is immersed in the etchant, which dissolves the exposed metal. This is the stage where the process is actually controlled: etchant concentration, bath temperature and agitation together determine the etch rate, and a constant rate is what makes a batch consistent.

Step six is finishing. The resist is stripped, the parts are deburred, cleaned and passivated where the material requires it. Passivation is worth noting because etching removes some of the chromium-rich passive layer that gives stainless steel its corrosion resistance.

Step seven is inspection. Parts are checked against the artwork for dimensional accuracy, wall quality and flatness, and the batch is documented with its material certificate and inspection record.

Frequently asked questions

How long does the chemical etching process take?

A typical job runs from a few days for a prototype to two to three weeks for a production batch. Preparation and exposure are fast, but etching, finishing and inspection each need time that cannot be compressed without risking quality.

Which stage most often limits the design?

Etching itself, through the minimum feature width and minimum web that the material and thickness allow. A very narrow slot in thick material cannot be etched uniformly, because the etchant cannot reach the bottom of the slot as freely as it reaches an open area. We check this against your drawing before production.

Is a photo etched edge suitable for sealing?

Yes. A chemically etched edge is square and free of the burr and recast layer that laser cutting leaves, and the wall angle is very slightly tapered. Many customers use etched parts directly as sealing faces, and we can hold a specific flatness if the application needs it.

Leave a Comment

Your email address will not be published. Required fields are marked *

Scroll to Top